
 In part 1, we went over the basics of using
Ant to create a redistributable
In part 1, we went over the basics of using
Ant to create a redistributable .jar
file,
suitable for use as a library in other projects. A lot of the time
however, you’re probably going to want to be building things which can
actually be run as regular Java applications.
Once again, the code for this tutorial is available in GitHub. More usefully, you may want to see the diff between the part 1 script and the new one.
Here’s a quick explanation of what we’ve done to achieve an executable jar file:
<!-- for a runnable jar file, add the main class name -->
<property name="main.class" value="net.shrimpworks.ant.Main"/>
Along with other common properties which may change from
project-to-project, I like to include the main class definition near the
top. This is simply the full class name of the class which holds your
public static void main(...) method.
When making non-runnable library projects, this may be left blank in the future.
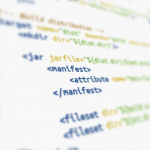
<jar ...>
    <manifest>
        <attribute name="Main-Class" value="${main.class}"/>
    </manifest>
    ....
</jar>
Here, we’re telling the Ant jar
task to create a custom
Manifest file
within the .jar file. The only attribute we need at this point, is to
tell it where to find our main class, stored in the ${main.class}
property. This manifest will also expand in future revisions of this
build file as we delve into dependency management and introduce third
party libraries to our project.
That’s all there is to this part. A quick ant in the project
directory, will yield an updated .jar file, which can be executed as
follows:
$ java -jar dist/hello-world.jar
Other parts in this series: